Stop treating your kitchen like a hobbyist playground and start viewing it as a high-precision laboratory for carbohydrate engineering. When we talk about Rice Cooker Basmati, we are not discussing a side dish; we are discussing the architectural integrity of the long-grain superstar. The goal is total elongation. We want grains so distinct they practically vibrate with individual energy, defying the gravitational pull of clumping or starch-induced sludge. Most home cooks commit culinary malpractice by drowning their grains in unmeasured reservoirs of lukewarm water. That ends today. We are hunting for that specific, floral aroma that signals the release of 2-acetyl-1-pyrroline, the chemical compound responsible for that intoxicating scent. To achieve the perfect Rice Cooker Basmati, you must master the delicate balance of thermal application and moisture ratios. This is a technical audit of your pantry and your process. If your rice looks like a wet sponge, you have failed the infrastructure test. Let us calibrate your equipment and refine your technique for maximum grain separation and aromatic impact.
THE DATA MATRIX
| Metric | Specification |
|---|---|
| Prep Time | 30 Minutes (Hydration Phase) |
| Execution Time | 20 Minutes (Thermal Cycle) |
| Yield | 4 Standard Servings |
| Complexity | 3/10 (Requires Precision) |
| Estimated Cost per Serving | $0.45 USD |
THE GATHERS
Ingredient Protocol:
- Extra-Long Grain Basmati Rice: 400g / 2 cups (Aged at least 12-24 months)
- Filtered Water: 475ml / 2 cups minus 2 tablespoons
- Neutral Oil or Ghee: 15ml / 1 tablespoon
- Kosher Salt: 5g / 1 teaspoon
- Green Cardamom Pods: 3 units (Cracked)
- Cinnamon Stick: 1 unit (2-inch segment)
Section A: Ingredient Quality Audit:
The primary failure point in Rice Cooker Basmati is the age and quality of the raw material. If your rice is "new crop," it contains excessive internal moisture, leading to a structural collapse during the boil. To fix this, reduce your water ratio by 10 percent. If your grains lack that signature nutty perfume, your 2-acetyl-1-pyrroline has dissipated due to poor storage. Always store rice in an airtight, opaque container. Furthermore, if your water has a high mineral content, it will interfere with the gelatinization of the starch. Always use filtered water to ensure the flavor profile remains clean and the texture stays crisp. If using ghee, ensure it is high-quality to infuse the grains with a rich, viscous mouthfeel without making them greasy.
THE MASTERCLASS
Step 1: The Mechanical Purge
Place your dry rice in a fine-mesh sieve. Use cold, running water to rinse the grains until the effluent runs perfectly clear. You are stripping away the surface starch that causes unwanted adhesion. Use a digital scale to ensure your dry weight is exact before the rinse begins.
Pro Tip: This step is about surface tension. By removing the "dust," you prevent the formation of a starchy film that traps steam and leads to mushy results.
Step 2: The Hydration Protocol
Submerge the rinsed grains in filtered water for exactly 30 minutes. This allows the moisture to penetrate the core of the grain, ensuring even cooking. Use a saucier or a deep bowl for this to allow for expansion.
Pro Tip: Hydration is the secret to elongation. Pre-soaked grains expand lengthwise rather than widthwise, giving you that professional, needle-like aesthetic.
Step 3: The Lipid Coating
Drain the rice thoroughly using a bench scraper to ensure every grain is moved from the soaking vessel. Place the rice in the cooker and drizzle with your oil or ghee. Toss gently with a silicone spatula to coat each grain.
Pro Tip: This creates a hydrophobic barrier. The fat prevents the grains from fusing together during the high-heat phase of the cooking cycle.
Step 4: The Thermal Activation
Add your measured water, salt, and aromatics. Close the lid and initiate the "Standard" or "White Rice" cycle. Do not use the "Quick Cook" setting; it is an enemy of structural integrity.
Pro Tip: The salt acts as a flavor enhancer and a structural stabilizer. It tightens the starch granules, preventing them from bursting and releasing excess amylopectin.
Step 5: The Post-Cycle Rest
Once the machine signals completion, do not open the lid. Let the rice sit undisturbed for 10 minutes. This allows the residual steam to redistribute, finishing the cook via gentle conduction.
Pro Tip: This is the "carryover" phase. Opening the lid early causes a sudden temperature drop, which can cause the grain surfaces to toughen while the centers remain undercooked.
Section B: Prep & Timing Fault-Lines:
The most common human error is the "impatient peek." Every time you open the lid, you lose the pressure and steam required for the final aerate phase. If you find your rice is still crunchy after the rest, you likely failed to measure your water with a digital scale. To fix this mid-stream, sprinkle 15ml of boiling water over the top and reset the "Warm" function for 5 minutes. If the rice is too soft, you over-soaked or used too much water; in this case, spread the rice on a sheet tray immediately to allow the excess moisture to evaporate.
THE VISUAL SPECTRUM
Section C: Thermal & Visual Troubleshooting:
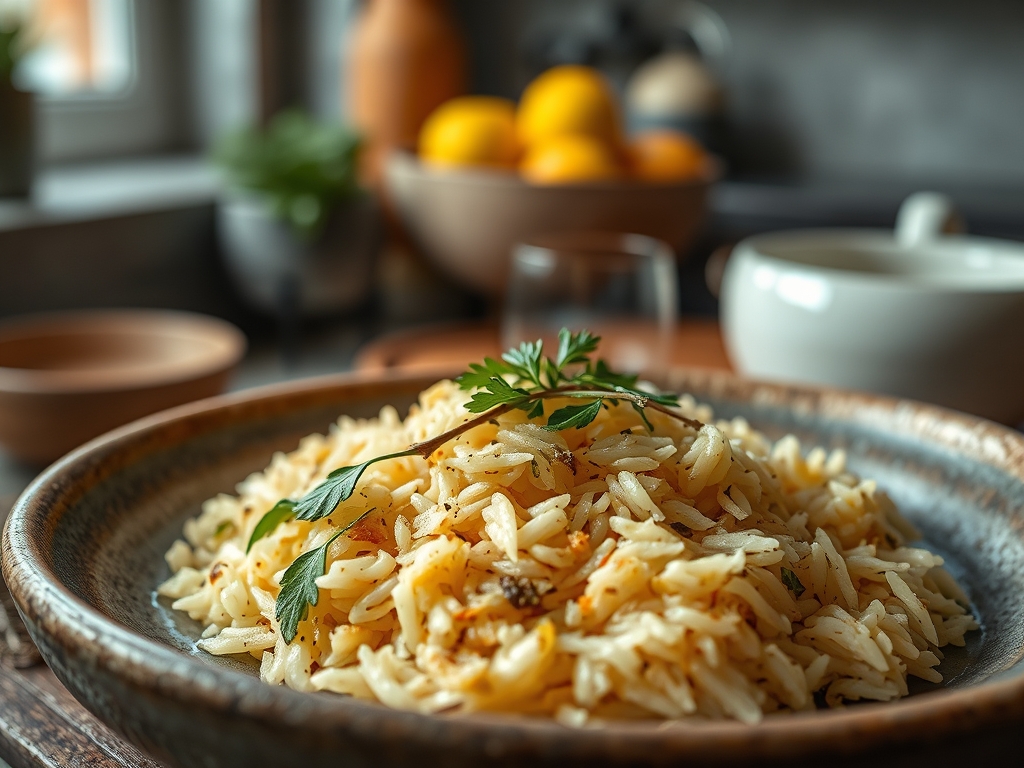
Referencing the Masterclass photo, your Rice Cooker Basmati should exhibit "standing" grains that appear to lean against one another rather than lying flat. If the color is dull or gray, your water was likely unfiltered or your pot was not clean. If the grains appear broken or jagged, you were too aggressive during the washing or stirring phase. You want a bright, pearlescent white finish. If you see uneven browning at the bottom, your cooker's thermal sensor is likely calibrated for larger batches; next time, add an extra teaspoon of oil to the base to render a more even heat distribution. The aromatics should be visible on top, having been pushed there by the convection currents of the boiling water.
THE DEEP DIVE
Macro Nutrition Profile:
A standard 150g serving of cooked Basmati provides approximately 205 calories, 4g of protein, 45g of carbohydrates, and 0.5g of fat (excluding added lipids). It is a low-glycemic index choice compared to short-grain varieties, meaning it provides a slower, more sustained energy release.
Dietary Swaps:
- Vegan: Use coconut oil or avocado oil instead of ghee.
- Keto: There is no direct keto swap for rice; however, you can mix 50% riced cauliflower with 50% Basmati to reduce the net carb load while maintaining the aromatic profile.
- GF: Basmati is naturally gluten-free; ensure your spices are certified to avoid cross-contamination.
Meal Prep & Reheating Science:
To maintain molecular structure during reheating, you must prevent retrogradation (the hardening of starch). Store rice in an airtight container for no more than 3 days. To reheat, add a teaspoon of water and cover tightly with film before microwaving. This creates a mini-steam chamber that re-hydrates the starch molecules without making them viscous or gummy.
THE KITCHEN TABLE
Why is my rice sticking to the bottom?
Your cooker may have a worn non-stick coating or you skipped the lipid coating step. Ensure you use ghee or oil to create a barrier between the starch and the heating element.
Can I add saffron to the rice cooker?
Yes. Bloom the saffron in two tablespoons of warm water first, then add it during the "Thermal Activation" step. This ensures the color and flavor infuse evenly throughout the entire batch.
Do I really need to soak the rice?
Yes. Skipping the 30-minute soak results in shorter, tougher grains. Hydration ensures the heat reaches the center of the grain at the same time the exterior finishes cooking.
How do I make the rice fluffier?
Use a fork or a plastic rice paddle to "fluff" the grains only after the 10-minute rest. This introduces air and separates the grains without breaking the delicate elongated structures.