Stop settling for the watery, lackluster results of a standard slow cooker stew. If your kitchen smells like a damp basement instead of a bustling Delhi spice market, you have failed the thermal activation test. We are here to execute a high-performance Multi Cooker Curry Base that functions as the structural backbone for any dish in your repertoire. This is not about tossing ingredients into a pot and hoping for a miracle; it is about the precise manipulation of lipids and aromatics to achieve a viscous, piquant masterpiece. We are targeting the Maillard reaction at a molecular level. By utilizing the pressurized environment of a modern multi cooker, we can force flavor compounds into the cellular structure of our aromatics in a fraction of the time. This process creates a concentrated foundation that is rich, deep, and chemically stable. Prepare to audit your pantry and recalibrate your expectations. We are moving beyond home cooking and into the realm of culinary infrastructure where heat, pressure, and fat converge to create liquid gold.
THE DATA MATRIX
| Metric | Specification |
|---|---|
| Prep Time | 20 Minutes |
| Execution Time | 45 Minutes |
| Yield | 1.5 Liters / 6 Cups |
| Complexity | 4 / 10 |
| Estimated Cost per Serving | $0.85 USD |
THE GATHERS
Ingredient Protocol:
- 500g / 4 large Yellow Onions (finely diced)
- 60ml / 4 tbsp Neutral Oil or Ghee
- 50g / 10 cloves Garlic (microplaned)
- 40g / 2-inch piece Fresh Ginger (grated)
- 15ml / 1 tbsp Tomato Paste (double concentrated)
- 10g / 2 tsp Turmeric Powder
- 15g / 3 tsp Ground Cumin
- 15g / 3 tsp Ground Coriander
- 5g / 1 tsp Kashmiri Chili Powder
- 400g / 14 oz Canned Crushed Tomatoes
- 250ml / 1 cup Filtered Water or Bone Broth
- 10g / 2 tsp Sea Salt
Section A: Ingredient Quality Audit:
If your onions are weeping excess moisture before they hit the pan, your knife is dull; sharpen it to avoid crushing the cell walls. Sub-par spices are the primary cause of a "flat" profile. If your cumin smells like dust rather than an earthy punch, it has oxidized. Technical fix: Toast whole seeds in a dry saucier and grind them fresh using a high-speed burr grinder. If your ginger is fibrous and woody, you are using old rhizomes. Use a spoon to peel the skin and ensure the flesh is juicy and bright yellow to guarantee a sharp, piquant finish.
THE MASTERCLASS
Step 1: Lipid Saturation and Aromatic Sweat
Set your multi cooker to the "Sauté" function on high. Add your ghee or oil and wait for the shimmering point. Incorporate the diced onions. Use a heavy-duty bench scraper to transfer your prep from the board to the pot without losing a single cube. Sauté until the onions are translucent and the edges begin to render their sugars into a golden hue.
Pro Tip: The science here is moisture evaporation. Onions are roughly 89 percent water; you must expel this liquid to allow the temperature to rise above 100C (212F) so the Maillard reaction can begin. Use a digital scale to ensure your oil-to-onion ratio is precise for even heat distribution.
Step 2: The Garlic-Ginger Infusion
Add the microplaned garlic and ginger to the center of the pot. Stir vigorously for exactly 60 seconds. You are looking for the raw sulfurous bite of the garlic to transform into a mellow, nutty aroma without crossing the line into burnt bitterness.
Pro Tip: Garlic contains allicin, which is highly volatile. By adding it after the onions have released their initial steam, you protect these delicate compounds from scorching. A silicone spatula is the professional tool of choice here to ensure no aromatics stick to the bottom of the vessel.
Step 3: Spice Activation and Deglazing
Reduce the heat setting. Add the tomato paste and all dry spices. Stir for 2 minutes until the oil begins to separate from the paste and turns a deep, brick red. This is the thermal activation of the fat-soluble carotenoids and essential oils within the spices. Pour in 50ml of your liquid to deglaze the pot, scraping up every brown bit (the fond) from the bottom.
Pro Tip: Many spice flavors are hydrophobic, meaning they do not dissolve in water. They require a lipid medium to "bloom." If you skip this step and add liquid too early, your curry will taste "raw" and dusty.
Step 4: Pressure Transformation
Add the crushed tomatoes and the remaining liquid. Secure the lid and set the multi cooker to "High Pressure" for 15 minutes. This environment forces the flavors to meld at temperatures exceeding the normal boiling point, mimicking a four-hour simmer in mere minutes.
Pro Tip: Pressure cooking accelerates the breakdown of pectin in the tomatoes and onions. This creates a naturally viscous texture without the need for thickeners like flour or cornstarch. Ensure your sealing ring is properly seated to prevent steam leakage.
Step 5: Emulsification and Final Audit
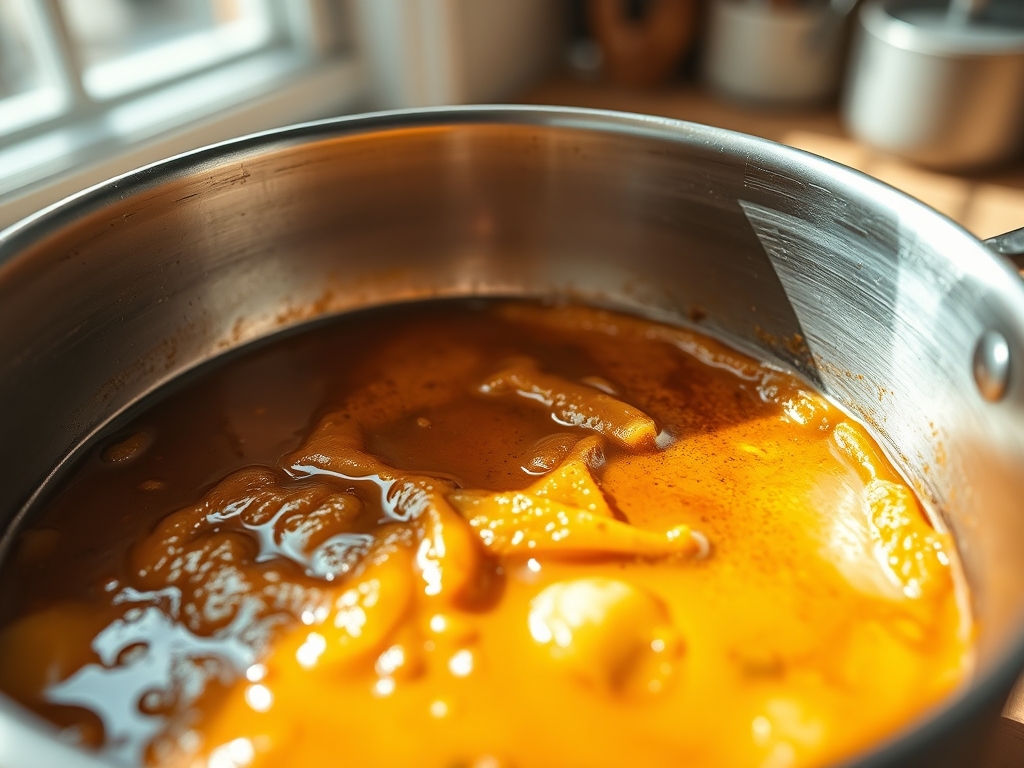
Once the pressure has naturally released for 10 minutes, perform a manual vent. Use an immersion blender directly in the pot to aerate and blend the base into a smooth, velvety consistency. The color should be a vibrant, glowing orange as seen in the reference photo.
Pro Tip: Emulsifying the oil back into the vegetable fibers creates a creamy mouthfeel. If the sauce looks broken or oily, continue blending on high speed to force the lipids into smaller droplets.
Section B: Prep & Timing Fault-Lines:
The most common human error is the "Rush Factor." If you do not allow the pressure to release naturally for at least 10 minutes, the sudden drop in pressure will cause the liquid to boil violently, toughening any delicate compounds and potentially spraying hot sauce through the steam valve. Another fault-line is temperature control during the sauté phase. If the pot is too crowded, the onions will boil in their own juice rather than fry. Work in batches if you are doubling the recipe to maintain high thermal energy.
THE VISUAL SPECTRUM
Section C: Thermal & Visual Troubleshooting:
Look closely at the Masterclass photo. The surface of the Multi Cooker Curry Base should have a slight sheen; this indicates proper lipid emulsification. If your base looks dull or matte, you likely under-measured the oil or over-blended, trapping too much air. If the color is a pale yellow instead of a deep sunset orange, your tomato paste did not caramelize sufficiently during the sauté phase. Uneven browning usually manifests as dark flecks in the sauce; these are burnt onions. To fix a bitter, burnt profile, add a teaspoon of sugar or honey to balance the carbon notes, but remember that prevention via constant stirring is the only true cure.
THE DEEP DIVE
Macro Nutrition Profile:
Per 250ml serving: 145 Calories, 9g Fat, 14g Carbohydrates, 3g Protein. This base is high in antioxidants like curcumin from the turmeric and lycopene from the processed tomatoes.
Dietary Swaps:
- Vegan: Use avocado oil or coconut oil instead of ghee.
- Keto: Eliminate the onions (high in sugar) and replace with sautéed celery and a pinch of asafoetida for that savory punch.
- GF: This recipe is naturally gluten-free as it relies on vegetable reduction for body.
Meal Prep & Reheating Science:
This base is a molecular tank. It freezes beautifully for up to 3 months. When reheating, do not use a microwave on high power; this ruptures the emulsion and causes the oil to slick on top. Reheat slowly in a saucier over medium-low heat, adding a splash of water to restore the original viscosity.
THE KITCHEN TABLE
Can I add meat directly to this base?
Absolutely. Brown your protein first using the sauté function, remove it, build the base, and then return the meat to the pot before the pressure cooking phase. This ensures the protein is infused with the activated spice oils.
Why is my curry base so thin?
You likely over-hydrated the pot. If the consistency is too loose after pressure cooking, use the "Sauté" function with the lid off for 5 to 10 minutes to reduce the liquid and concentrate the solids.
Is the immersion blender step mandatory?
While not strictly mandatory for flavor, it is essential for the "restaurant-style" texture. A chunky base is a rustic compote; a blended base is a professional culinary foundation that coats a spoon perfectly.
Can I use fresh tomatoes instead of canned?
Yes, but you must increase the salt and cook time. Canned tomatoes are processed at peak ripeness and provide a consistent acidity and sugar content that fresh grocery store tomatoes often lack in the off-season.